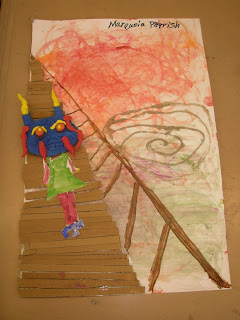
For my third graders, I wanted to do a lesson using the shaving cream marbling effect. Yes, Shaving Cream in Art! When I came across a transparency of Edvard Munch's "The Scream" a lightbulb went off! The swirls in the sky are perfect for the shaving cream marbling!

Next, The students needed to make their bridges. I decided to keep this project going with as much variety as possible. So for our bridge we used strips of cardboard. We talked about depth and how things appear smaller the further they go back. The students had to draw a line from the top left corner to the bottom right corner. THis is how their cardboard strips had to fit in to make their boardwalk- like bridge.
After Drawing the railing, the Last step was to make a sandy island. The students "drew" their island with glue and then sprinkled sand on to dry . This was also done at the front table with students being called up.
The students loved all of the lines in the painting and really wanted to know what the man was looking at that made him so scared. I asked them how they knew he was scared and not happy or sad or nervous. The students and I talked about Expressionism and then I had them write a Descriptive paragraph about what they think the man saw. I challenged them to use as many adjectives or "describing words" as possible- This is important because they will later be making these creatures out of model magic. The goal is for the students to make the other half of this picture.
The next step was the Shaving Cream Marbling because this will be their background. This is a great technique that can be incorporated into all different projects. What you need is
- Acrylic Paint (I use the little tubes of acrylic craft paint from AC Moore- Can usually be found on a good sale!)
-Shaving Cream
-Cardboard box lids.. ideally one for each student
- Pieces of cardboard cut up into squares
-Sink/Paper Towels for clean up
-Smocks
- Plastic Knives
-Plastic Forks
I did not have enough supplies for each student to do this at their desk, plus I like to contain the chaos/mess to one controlled area. While the students were doing their writing I called up four students at a time where I assisted them with their Shaving Cream.
1- Write name on paper
2- Flip over and lay flat inside cardboard box lid
3- Squirt out shaving cream and smooth flat with the knife, almost like icing a cake
4- Squirt chosen colors of paint I remind the students that they do not want Mud, so they need to plan their colors. They do sky colors near the top and water colors near the bottom.
5- With the forks or knives, swirl the paint and shaving cream making designs and patterns.
6- With the Cardboard squares, Wipe off all of the shaving cream, The shaving cream should come off, but the Paint should be left on the paper in the swirly designs that were made with the fork.
Next, the students began to make their creatures out of model magic. We talked about how to mix the colors to make new colors and how to roll or cut the clay to make different shapes. The students loved doing this!
Next, The students needed to make their bridges. I decided to keep this project going with as much variety as possible. So for our bridge we used strips of cardboard. We talked about depth and how things appear smaller the further they go back. The students had to draw a line from the top left corner to the bottom right corner. THis is how their cardboard strips had to fit in to make their boardwalk- like bridge.
After Drawing the railing, the Last step was to make a sandy island. The students "drew" their island with glue and then sprinkled sand on to dry . This was also done at the front table with students being called up.
What a Great Job they did!!!


No comments:
Post a Comment