Pages

Showing posts with label 4th grade. Show all posts

Sunday, April 3, 2016

Batik landscapes

This 4th grade class did Batik Painting.  This is an art form that originated in Indonesia where hot wax is melted and put onto fabric and then dyed.  We took a different approach but tried to get the same effect.  This requires lots of patience and Trust!

 First students draw their landscape and then outline the pencil very thickly with chalk.  Students must paint in the areas not once, not twice, but THREE times!  Once that is dry, they take black India Ink and paint over all their hard work.  Believe me this is not easy to do after spending weeks painting!  Once the ink dries, students come over to the sink area and slowly wash off the ink- this gives it a neat effect.

Finally, chalk pastel is applied to add detail and fill in some areas.

Chalk Pastel Glue Landscapes

4th Grade Focuses on Landscapes.  Each 4th Grade class used different media and techniques to create their landscapes.  This class drew their landscape on black paper and then traced over all of their pencil lines with glue.  The glue dries clear and bumpy creating a barrier for the chalk pastels.  They then blended the chalk pastels in their shapes. The students created vivid colors and stunning landscapes!


Rock Art

Mrs. Robinson's 4th Grade class earned their 10 clips up and voted on painting rocks!  What a fun way to turn nature into art!  We looked at rock art from Australia and also some examples of rocks turned into animals and then the students picked their rock, sketched their idea then got to work!

Mystery bag sculptures

One 4th Grade class earned their 10 clips up and voted on Recycled Sculptures.  As a class we looked at modern sculptures and classic sculptures.  Students were then given the option of working with a partner or by themselves.  I gave each pair or person a mystery bag! In the mystery bag was a variety of objects anything from straws to old cds to buttons to toilet paper rolls.  THE CHALLENGE:  Somehow use everything in the mystery bag to create a free standing sculpture!  This was so much fun!  The students came up with some great plans- I can't wait to see the finished products!


Friday, January 15, 2016

Collage landscapes

4th Graders are focusing on Landscapes.  Each 4th Grade class is creating a landscape with a different technique.  However, everyone needs to make sure they are including all of the parts of a landscape!

Mrs. Robinson's 4th Grade Class learned about Grant Wood & David Hockney.  We looked at the rolling hills and their farm land.  They rotated around the room and used different painting techniques to create a variety of painted paper.  Students then went to work creating their landscapes.  Students were encouraged to put larger objects in the front and smaller objects further away to show distance and depth.  Here are just a few of their beautiful collage landscapes!  

Tuesday, November 10, 2015

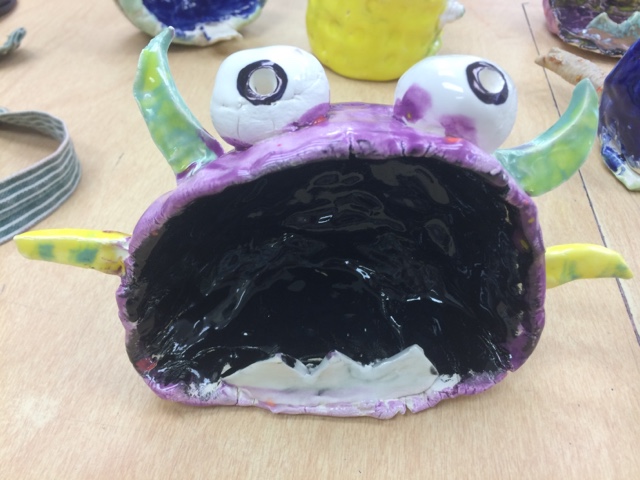
Monster pots

Now that the Monsters have come out of the kiln they are ready for glazing!!  This is a fun part because the students get to see how much the glazes change from when they paint it on their bisqueware to when it comes out of the kiln.  

Students painted on 3 coats of glaze and waited for the results!  


Ta Dah!!!!  Now their monsters are shiny, bright and feel like glass!!!


Click Here to see the beginning of this lesson!

Sunday, October 4, 2015

Monster Mania!!!

This past week, I introduced Oregon artist James DeRosso to my students.  They all had something to say about his silly monster sculptures!    
             
Every grade will be making a variation of Monsters, but 4th and 5th Graders will be making monsters out of clay just like James DeRosso!  I am lucky enough to have a Kiln at my school and now that I have gotten used to it over the past year, I am ready to put it to a lot of use!  


This class watched the video of James DeRosso and then watched as I demonstrated how to make a Pinch Pot.  I showed them how we are going to take the pot, turn it on its side and the opening becomes the mouth!  

We went over the 4 S's 

Scratch
Slip
Secure
Smooth 

 Students attached monster teeth, eyeballs, horns etc to their heads.  I have them put them on a board by the color table they sit at so I can try and keep them organized for a quick return!  
Stay Tuned for more Monster Projects!!!
Click Here to see the finished product

Thursday, October 15, 2009

Amate Bark Paintings

For Hispanic Heritage Month I chose to do a project focusing on Amate Bark Paintings.  This worked out well because we had limited supplies and the brown food store bags worked great for the faux wood backgrounds.  The paper bags were painted with black ink and ironed with wax paper to give the appearance of the traditional Amate Bark Paintings.  Next the students got to work by choosing their animals and drawing their scenes in chalk on the brown paper so that it could be seen easily.  I supplied them with visuals of animals such as lizards, alligators, and parrots.


Once the students drew their animals they were able to start painting.  I talked to the students about color schemes and balancing their colors.  To help the students to remember to plan out and balance their colors, I gave each table once color of paint at a time.  This forced them to use that color, check if it was evenly balanced throughout their drawing before they moved on.  The results were stunning!!


Vincent Van Gogh Sunflowers

Vincent Van Gogh was our Mystery Artist so I read the students Camille & The Sunflowers: A Story about Vincent Van Gogh  by Laurence Anholt and then we began to make sunflowers!

If you haven't realized yet, I love doing lots of different layers to one project.  

  1. Students created a Horizon Line on their paper
  2. The top half (the wall) was sponge painted
  3. The bottom half (the table) was done using tissue paper and modge podge (glue mixed with water) 
  4. The students drew and cut out a symmetrical Vase on a separate piece of brown paper.  
  5. Stems were arranged and glued on the vase.  Remind students that the stems cannot come off the vase
  6. The stems and vase were glued onto the backgrounds.
  7. The water was sponge painted on and white was used to show the glass.
  8. The scrap brown paper from the vase is cut into circles to be the center of the sunflowers
  9. Petals are painted on using tempera paint
  10. Students sew on addition petals and leaves using Burlap and large needles safe for kids.