Pages

Friday, May 27, 2011

Aargh Matey!

As summer approached, I wanted to do a themed lesson, but not the typical fish or beach scene So I decided to do PIRATES with my first graders!!  We read two different pirate stories.  We talked about how Pirates' lives are different than our own lives. The first graders all thought it sounded like the Pirates had a lot of fun!  

We talked about all the different things the Pirates were wearing; eye patches, hooks, bandanas etc.  The students went back to their desks to begin drawing their Pirates.  While the students were working on their pirates (No Stick figures!!!) I called students up to the painting table to do their water.  Students painted their entire paper blue, and then took a plastic fork and scraped in wave designs, this created nice movement in the background.    

Saturday, May 14, 2011

"The Scream"

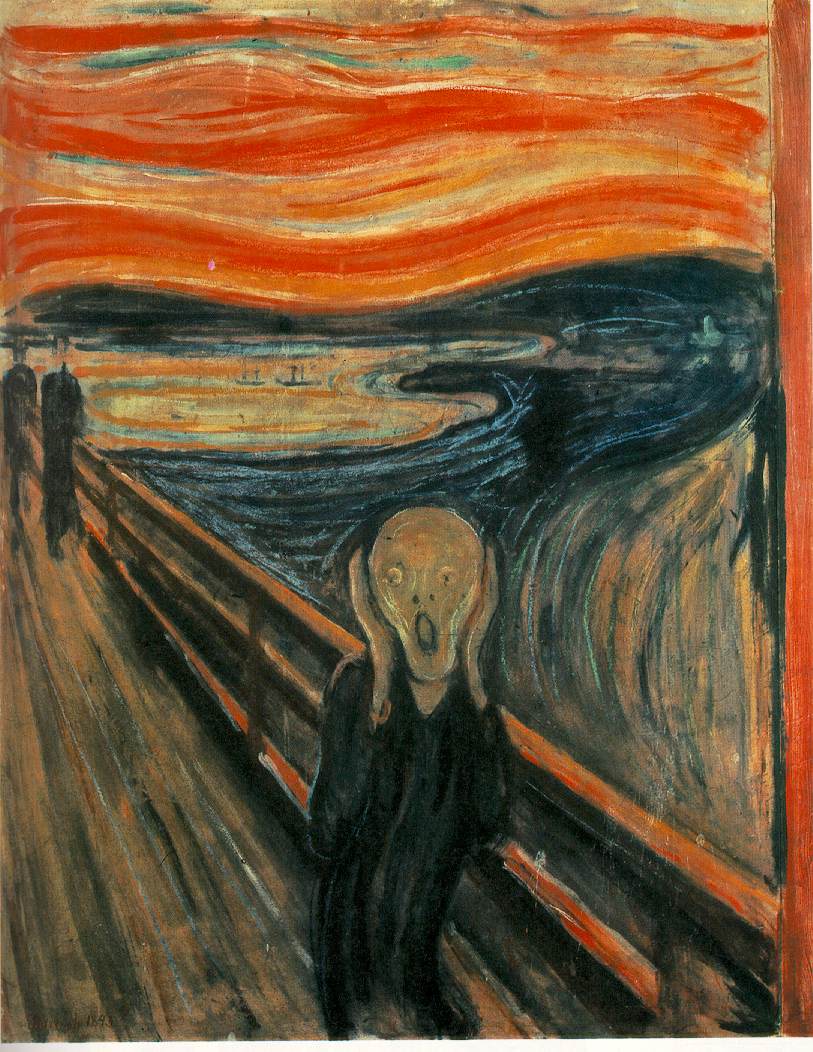
For my third graders, I wanted to do a lesson using the shaving cream marbling effect. Yes, Shaving Cream in Art!  When I came across a transparency of Edvard Munch's "The Scream"  a lightbulb went off!  The swirls in the sky are perfect for the shaving cream marbling!


The students loved all of the lines in the painting and really wanted to know what the man was looking at that made him so scared.  I asked them how they knew he was scared and not happy or sad or nervous.  The students and I talked about Expressionism and then I had them write a Descriptive paragraph about what they think the man saw.  I challenged them to use as many adjectives or "describing words" as possible- This is important because they will later be making these creatures out of model magic.  The goal is for the students to make the other half of this picture.    

The next step was the Shaving Cream Marbling because this will be their background.  This is a great technique that can be incorporated into all different projects.  What you need is 
- Acrylic Paint (I use the little tubes of acrylic craft paint from AC Moore- Can usually be found on a good sale!) 
-Shaving Cream 
-Cardboard box lids.. ideally one for each student 
- Pieces of cardboard cut up into squares 
-Sink/Paper Towels for clean up
-Smocks
- Plastic Knives
-Plastic Forks

I did not have enough supplies for each student to do this at their desk, plus I like to contain the chaos/mess to one controlled area.  While the students were doing their writing I called up four students at a time where I assisted them with their Shaving Cream.  
1- Write name on paper
2- Flip over and lay flat inside cardboard box lid 
3- Squirt out shaving cream and smooth flat with the knife, almost like icing a cake
4- Squirt chosen colors of paint I remind the students that they do not want Mud, so they need to plan their colors.  They do sky colors near the top and water colors near the bottom.  
5- With the forks or knives, swirl the paint and shaving cream making designs and patterns.
6- With the Cardboard squares, Wipe off all of the shaving cream, The shaving cream should come off, but the Paint should be left on the paper in the swirly designs that were made with the fork.  

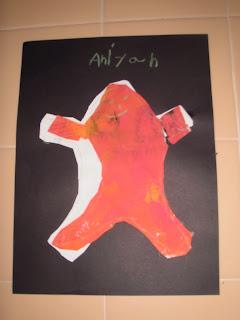
Next, the students began to make their creatures out of model magic.  We talked about how to mix the colors to make new colors and how to roll or cut the clay to make different shapes.  The students loved doing this!  

Friday, April 29, 2011

Color Wheel Flowers


It was time for The third graders to learn about Color Theory.  Instead of just making a typical circular color wheel, I wanted the students to make a Color wheel that would turn into a beautiful picture.  So we went with Flowers!
Color Mixing Quiz

Thursday, April 21, 2011

BackDrops, Murals & Bulletin Boards

For Various School Concerts, Assemblies, or Holidays the Art Teacher is called upon to beautify the Space.  Although it is time consuming, it is one of my favorite things to do! 


 Below, we are making a Backdrop for the Winter Concert.  We also made Giant Sparkly Snowflakes to hang up on the stage.


Thursday, April 14, 2011

Aboriginal Snakes


In college I spent 6 months In Melbourne, Australia as part of a Study Abroad Program. 

Me in front of Uluru 
We wore Mosquito Nets on Our head to keep off All the FLIES!
What a rewarding experience!!  Melbourne was the cleanest and most functioning city I have ever seen and the people were so friendly!  During my stay there I traveled with a group to the center of Australia.. To the place which makes up what most American's imagine of Australia.. The Great Outback.  The red sand, Hot sun, and nothing but rocks!  One thing you don't see in the pictures are all the FLIES!
kangaroo Tails- Poor Kangaroos!
                                                                                                                     

Tuesday, April 12, 2011

Embroidered Birds

To celebrate the start of Spring I had my Second Graders do an art lesson with Birds as the Subject Matter.  But I really surprised them when I said we would be sewing our birds instead of painting or drawing them! 


The first thing we did was go over Needle safety.  We used needles that are a little more blunt and made for  children, but even so it is important to be careful.   


Next I gathered the students around the table for a demonstration.  I went over how to thread the needle and how to form a knot at the end so that the yarn doesnt come through the other side.  Next I showed them a few different kinds of stitches and the different effects each stitch had.  

Friday, April 8, 2011

Endangered Animals

Every child has some sort of collection growing up and mine was Panda Bears.. I was obsessive about it!  My collection resulted both in me having over a thousand Pandas AND a huge awareness for endangered animals.   So any chance I get to do a project involving Panda Bears or anything involving Endangered Animals, I go for it!  


 My Inspiration for this lesson came from a Kohl's ad.  They were advertising a T-Shirt with a cartoon cat's face made out of a Peace Sign.  What a great idea.. lots of animals have the long snout nose that can go along with the bottom of the peace sign.  As you will see below we exaggerated the animals that were naturally capable of this look- We call it our creative License!
 So My third and fourth grade special Education Class were already studying animals in class so I decided to extend upon their classroom lesson and focus on Endangered Animals!  We talked about how some animals were very close to extinction and a lot of the cause came from Humans! The World Wildlife Fund is a great site to use and you can even adopt an animal in need for your classroom!  I obviously "adopted" a panda as a child and then in my classroom everyone brought in a dollar and we adopted a "class pet"  THis really got the students involved in the project and to feel like they were helping!  

Wednesday, April 6, 2011

Dinosaurs

 I love collaborating with other teachers and I love Dinosaurs- So when the Librarian came to me and wanted to do a Dinosaur unit together I was very excited and immediately set to work on creating a Lesson that was suitable for the class.  It is an autistic Class with students ranging from 9-12 but most are on a first grade level.  I always have so much fun working with this class and like to include as many textures as possible!  
 THe Librarian gave me a list of each student's assigned dinosaur that they would be researching so I got to work on finding step by step drawings for these.  Conveniently, I had Dinosaur Texture Paper so the students were able to follow their worksheet and step by step draw their specific dinosaurs.  The students then cut out their dinosaurs, with some assistance.

Saturday, March 26, 2011

Collage Birds

The Kindergarteners worked together to create a Class Mural.  


Wednesday, March 2, 2011

Animals & the Alphabet

My Prek autistic Class consists of 6 kids and has proven to be quite the challenge.  What I have learned so far is to keep them moving!!  SO what I do, is have a few projects going on at once.  THe supplies are all set up at different tables and we do one step of one project and then Move to the next table and start a new project and in the 45 minutes we will probably start 4 different projects.  For this specific class I always try to go along with what their classroom teacher is doing because they need as much reenforcement as possible.  

At this time they were working on the Alphabet and Animals.

Tuesday, March 1, 2011

This Cat Needs a New Hat!!

For Read Across America, I created a contest for my  Second Graders!  Their goal was to make Dr. Seuss's Cat in the Hat a New Hat!! They had to use their imagination to create a unique new hat to replace the classic red & white striped hat that Dr. Seuss has made famous!  I talked to the students about how professional or famous artisits usually make several sketches before starting their artwork sometimes with very small modifications.  They also plan out their colors before starting.  So The students were to complete several sketches of different designs for their hat & then the students were supposed to star * their favorite design and that was the design they were going to do for the contest.  The kids came up with some great ideas!!! Once their hats were drawn on big paper I introduced the class to all the different supplies I had to offer I then went around to each table and took their "orders" like a waitress at a restaurant would.  The students enjoyed this!  I delivered the supplies to each table and they began!!  Here are the student's Creative Hats!!   


Which hat would you have chosen to win??

One Fish Two Fish Red Fish Blue Fish

Here's another great lesson for read across america- I got it from the awesome site, Deep Space Sparkle and found it very successful & fun!  I did it with my first graders and they had so much fun drawing their fish! 


We read Dr. Seuss's book, One Fish, Two Fish, Red Fish, Blue Fish, which is actually a lot longer than I remembered it being as a child.  I did a directional drawing with the students where we all drew the fish together.  I broke down the fish into simple shapes.  A rainbow line for the top of the head etc. I did one example for vertical fish & one for horizontal fish.  We drew our fish with black oil pastel so there was no erasing which forced the students to take their time and learn to fix their mistakes and not just throw it away and start over.  In my art room we follow the mantra, there's no such things as mistakes!  I always encourage my students to take what they consider a mistake and change it into something new- some of the most famous artworks came to be that way. 


Yertle The Turtle

Once a week I have an Autistic Pre-K class.  There are only 6 students and two aids but by the end of 40 minutes I am exhausted!! They are super cute, little, love art and are FULL of energy!! I run this class very different than any of my other classes.  Each table is a station and we either work on the start of several projects in one class or we take each paper from station to station to add new materials.   Doing one thing for too long results in wanderers! In this particular lesson we took our paper from station to station.  
 

There's A Wocket in My Pocket

I LOVE Dr. Seuss!  So Read Across America Month is the perfect excuse to do a ton of Dr. Seuss inspired art lessons!  This year I read There's a Wocket in My Pocket to my Special Education 3/4th grade class.  We had a few laughs as we read the book and then while we were still on the carpet, I split the students into pairs and gave them some magazines.  I explained that they each needed to find a magazine picture of an object... such as a pocket, glass, couch, house etc. and rip it out, NICELY.  We would be creating our own creatures to live in those objects!  

The students were sent back to their seats to write their rhyming sentences.  There was only one rule-  The rhyming word had to be silly!!  "There's a mouse in my house"  just would not do!  "There's a Touse dancing on top of my house" was perfectly acceptable though!


Students were encouraged to be as creative as possible!  The students were to sketch their new imaginary creatures.  When sketches were approved, the students painted them with watercolor and then outlined with black permanent marker.  The objects were glued onto their magazine backgrounds.

My Many Colored Days

Here's another Dr. Seuss inspired lesson.  I try to take a theme and then get all of my grade levels to do a different project within that theme.  This sometimes poses a challenge but it's always worth it in the end!  I am currently at a school that is Pre-k through 3rd grade so it limits the amount of different lessons that I need to create.  With the combination of snow days, holidays, and various assemblys my kindergarten classes were left with one class period to make a picture for Read Across America.  We read My Many Colored Days  by Dr. Seuss which is a very short book which talks about how colors can represent feelings. 


 I made a chart with all the different colors written and the class and I brainstormed how each color made us feel.. mad, sad, happy, excited etc.  When the students went back to their seats they got a slip of paper that said..  "The Color ________ makes me feel _________."  The students had to fill in the blank.  As the students were doing this (with spelling assistance from their classroom aid) I passed around tracers of simple figures like the ones used in the book, a magzine page and a white piece of paper to each student.  I chose to use pages from magazines to give their people a little more interest and texture.  Although, if the student was a little over zealous with the paint you would never know they used magazines.  

Monday, February 21, 2011

Jazz Music Collage

This project was in collaboration with the music teacher.  I took the music sheet to the song the class was singing/dancing to in the Black History Month Concert & had the students use these as part of their collage.  An Autistic Class completed these.  The students ranged from 1st to fourth grade.  We focus on manipulation of materials as well as arrangement/spacing.  Key Concepts that are reviewed are Collage, Warm vs. Cool Colors, Background, three-dimensional vs. two dimensional.  


The first thing I do is dump a bunch of music notes onto their tables.  These I have cut out of manila folders.  The students pick which ones they want and tape them onto their paper.  


Next, the students are given warm colors ( I tell them to think of a flame)  They sponge paint their papers going right over their music notes.